SpringBoot 开发基本的WEB应用
一、 静态资源的访问
SpringBoot默认提供静态资源目录位置在classpath下,目录名需要符合如下规则:
- /static
- /public
- /resources
- /META-INF/resources
举例:我们可以在src/main/resources/目录下创建static,在该位置放置一个图片文件,启动程序后,尝试访问http://localhost:8080/D.jpg。如果可以显示图片,配置成功。
二 渲染WEB页面
在之前的实例中,我们是通过@RestController来处理请求,所以返回的内容为json对象。那么如果需要渲染html页面的时候,要如何实现呢?
1 模板引擎
在动态HTML实现上Springboot依然可以完美胜任,并且提供了多种模板引擎的默认配置支持,所以在推荐的模板引擎下,我们可以很快的上手开发动态网站。
SpringBoot提供了默认配置的模板引擎主要有以下几种:
- Thymeleaf
- FreeMarker
- Velocity
- Groovy
Mustache
SpringBoot 建议使用这些模板引擎,避免使用JSP,若一定要使用JSP将无法实现SpringBoot的多种特性。
当你使用上述模板引擎中的任何一个,它们默认的模板配置路径为: src/main/resources/templates .当然也可以修改这个路径。
2 Thymeleaf
Thymeleaf是一个XML/XHTML/HTML5的模板引擎,可用于WEB与非WEB环境中的应用开发,这是一个开源的JAVA库,基于Apache License 2.0许可。
Thymeleaf提供了一个用于整合SpringMVC的可选模块,在应用开发中,你可以使用Thymeleaf来完全替代JSP或者其他模板引擎。如Velocity/FreeMarker等。Thymeleaf的主要目标在于提供一种可被浏览器正确显示的、格式良好的模板创建方式,因此也可以用作静态建模。你可以使用它创建经过验证的XML与HTML模板。相对于编写逻辑或代码,开发者只需将标签属性添加到模板即可。接下来,这些标签属性就会在DOM(文档对象模型)上执行预先制定好的逻辑。
- Thymeleaf 在有网络和无网络的环境下皆可运行,即它可以让美工在浏览器查看页面的静态效果,也可以让程序员在服务器查看带数据的动态页面效果。这是由于它支持 html 原型,然后在 html 标签里增加额外的属性来达到模板+数据的展示方式。浏览器解释 html 时会忽略未定义的标签属性,所以 thymeleaf 的模板可以静态地运行;当有数据返回到页面时,Thymeleaf 标签会动态地替换掉静态内容,使页面动态显示。
- Thymeleaf 开箱即用的特性。它提供标准和spring标准两种方言,可以直接套用模板实现JSTL、 OGNL表达式效果,避免每天套模板、该jstl、改标签的困扰。同时开发人员也可以扩展和创建自定义的方言。
- Thymeleaf 提供spring标准方言和一个与 SpringMVC 完美集成的可选模块,可以快速的实现表单绑定、属性编辑器、国际化等功能。
3 一个快速的例子
- 加入thymeleaf支持,修改pom.xml:
<dependency>
        <groupId>org.springframework.boot</groupId>
        <artifactId>spring-boot-starter-thymeleaf</artifactId>
</dependency>
- 编写一个controller
package com.chu.controller;

import org.springframework.ui.ModelMap;
import org.springframework.web.bind.annotation.RequestMapping;
import org.springframework.web.bind.annotation.RestController;

/**
 * Created by P70 on 2016/12/23.
 * 如果你写成RestController的话,就不会返回模板,而是直接给你返回一个文本
 */
@Controller
public class HelloController {

    @RequestMapping("/hello")
    public String index() {
        return "Hello World";
    }

    @RequestMapping("/thymeleafviewdemo")
    public String index(ModelMap map) {
        // 加入一个属性,用来在模板中读取
        map.addAttribute("host", "http://www.sina.com.cn");
        // return模板文件的名称,对应src/main/resources/templates/thymeleafviewdemo.html
        return "thymeleafviewdemo";
    }
}
- 修改thymeleafviewdemo.html
<!DOCTYPE html>
<html xmlns="http://www.w3.org/1999/xhtml"
      xmlns:th="http://www.thymeleaf.org">
<head lang="en">
    <meta charset="UTF-8" />
    <title></title>
</head>
<body>
<h1 th:text="${host}">Hello World</h1>
</body>
</html>
如上页面,直接打开html页面展示Hello World,但是启动程序后,访问h ttp://localhost:8080 ,则是展示Controller中host的值:http://www.sina.com.cn,做到不破坏Html自身内容的数据逻辑分离。
4 Thymeleaf的默认参数配置
如有需要修改默认配置的时候,只需要复制下面要修改的属性到application.properties中,并修改成需要的值,如修改模板文件的扩展名,修改默认的模板路径等。
# Enable template caching.
spring.thymeleaf.cache=true
# Check that the templates location exists.
spring.thymeleaf.check-template-location=true
# Content-Type value.
spring.thymeleaf.content-type=text/html
# Enable MVC Thymeleaf view resolution.
spring.thymeleaf.enabled=true
# Template encoding.
spring.thymeleaf.encoding=UTF-8
# Comma-separated list of view names that should be excluded from resolution.
spring.thymeleaf.excluded-view-names=
# Template mode to be applied to templates. See also StandardTemplateModeHandlers.
spring.thymeleaf.mode=HTML5
# Prefix that gets prepended to view names when building a URL.
spring.thymeleaf.prefix=classpath:/templates/

#THYMELEAF    (ThymeleafAutoConfiguration)
#spring.thymeleaf.check-template-location=true
#spring.thymeleaf.prefix=classpath:/templates/
#spring.thymeleaf.excluded-view-names=
spring.thymeleaf.mode=HTML5
spring.thymeleaf.encoding=UTF-8
spring.thymeleaf.content-type=text/html
spring.thymeleaf.cache=true
三 复杂一些的Thymeleaf模板
1 基于类的数据载体
- 新建Person类,作为数据载体
package com.chu.model;

/**
 * Created by P70 on 2016/12/26.
 */
public class Person {

    private String name;

    private int age;

    public Person(String name,int age) {
        this.name = name;
        this.age = age;
    }

    public String getName() {
        return name;
    }
    public void setName(String name) {
        this.name = name;
    }
    public int getAge() {
        return age;
    }
    public void setAge(int age) {
        this.age = age;
    }
}
- 新建一个Controller
package com.chu.controller;

import com.chu.model.Person;
import org.springframework.stereotype.Controller;
import org.springframework.ui.Model;
import org.springframework.web.bind.annotation.RequestMapping;

import java.util.ArrayList;
import java.util.List;

/**
 * Created by P70 on 2016/12/26.
 */
@Controller
public class PersonController {
    @RequestMapping("/PersonView")
    public String index(Model model){
        Person onePerson = new Person("微儿博客", 18);

        List<Person> list = new ArrayList<Person>();
        Person p1 = new Person("张三", 18);
        Person p2 = new Person("李四", 19);
        Person p3 = new Person("王五", 20);
        list.add(p1);
        list.add(p2);
        list.add(p3);

        model.addAttribute("oneperson", onePerson);//向模板传数据
        model.addAttribute("people", list);
        return "person";//找到名为person.*的模板
    }
}
- 新建一个对应的模板
<!DOCTYPE html>
<html xmlns:th="http://www.w3.org/1999/xhtml">
<head>
    <meta charset="UTF-8"/>
    <title>test</title>
    <link th:href="@{css/bootstrap.min.css}" rel="stylesheet"/>
</head>
<body>
<div class="panel panel-primary">
    <div class="panel-heading">
        <h3 class="panel-title">访问model</h3>
    </div>
    <div class="panel-body">
        <span th:text="${oneperson.name}"></span>
    </div>
</div>
<div th:if="${not #lists.isEmpty(people)}">
    <div class="panel panel-primary">
        <div class="panel-heading">
            <h3 class="panel-title">列表</h3>
        </div>
        <div class="panel-body">
            <ul class="list-group">
                <li class="list-group-item" th:each="person:${people}">
                    <span th:text="${person.name}"></span>
                    <span th:text="${person.age}"></span>
                    <button class="btn" th:onclick="'getName(\''+${person.name}+'\');'">获取名字</button>
                </li>
            </ul>
        </div>
    </div>
</div>
<script type="text/javascript" th:src="@{js/jquery-1.12.3.min.js}"></script>
<script type="text/javascript" th:src="@{js/bootstrap.min.js}"></script>
<script th:inline="javascript">
    function getName(name){
        alert(name);
    }
</script>
</body>
</html>
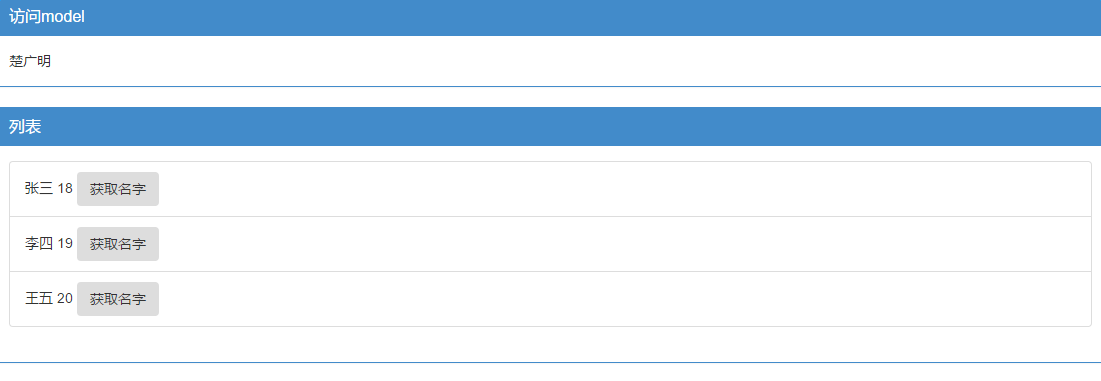
- 结果
代码下载地址:
2 Bean值的替换
- Controller
package com.chu.controller;

import com.chu.model.Product;
import org.springframework.stereotype.Controller;
import org.springframework.ui.ModelMap;
import org.springframework.web.bind.annotation.RequestMapping;
import org.springframework.web.bind.annotation.RestController;

/**
 * Created by P70 on 2016/12/23.
 */
@Controller
public class HelloController {
    @RequestMapping("/thymeleafviewdemo2")
    public String index2(ModelMap map) {
        Product product=new Product("P50","12000","大连");

        // 加入一个属性,用来在模板中读取
        map.addAttribute("product", product);
        // return模板文件的名称,对应src/main/resources/templates/thymeleafviewdemo2.html
        return "thymeleafviewdemo2";
    }

}
- Model
package com.chu.model;

/**
 * Created by P70 on 2016/12/27.
 */
public class Product {
    private String description;
    private String price;
    private String availableFrom;

    public String getDescription() {
        return description;
    }

    public void setDescription(String description) {
        this.description = description;
    }

    public String getPrice() {
        return price;
    }

    public void setPrice(String price) {
        this.price = price;
    }

    public String getAvailableFrom() {
        return availableFrom;
    }

    public void setAvailableFrom(String availableFrom) {
        this.availableFrom = availableFrom;
    }
}
- View
<!DOCTYPE html>
<html xmlns:th="http://www.w3.org/1999/xhtml">
<head lang="en">
<meta charset="UTF-8" />
<title></title>
</head>
<body>
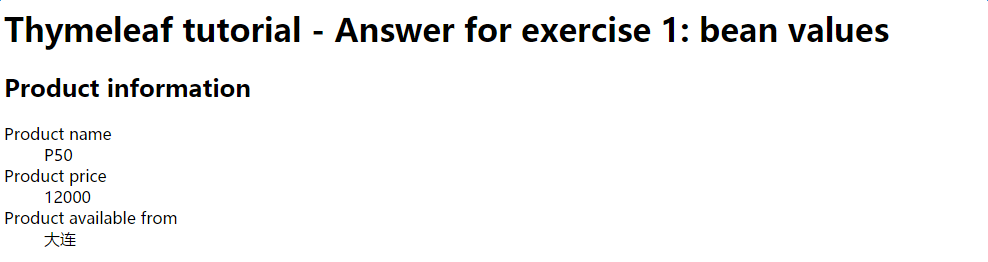
<h1>Thymeleaf tutorial - Answer for exercise 1: bean values</h1>
<h2>Product information</h2>
<dl>
<dt>Product name</dt>
<dd th:text="${product.description}">Red Chair</dd>
<dt>Product price</dt>
<dd th:text="${product.price}">350</dd>
<dt>Product available from</dt>
<dd th:text="${product.availableFrom}">2014-12-01</dd>
</dl>
</body>
</html>
3 资源文件乱码问题
问题描述
当在.properties的配置文件中有中文时,读取出来的总是乱码。比如我的application.properties配置文件的内容如下:
server.port=9090
test.msg=你好:Springboot
当在程序中读取test.msg值时总是会得到乱码,默认是以ISO-8859-1的字符编码读取,尝试的方法有:
- 添加配置
banner.charset=UTF-8
server.tomcat.uri-encoding=UTF-8
spring.http.encoding.charset=UTF-8
spring.http.encoding.enabled=true
spring.http.encoding.force=true
spring.messages.encoding=UTF-8
- 设置文件类型
将application.properites的文件类型修改为UTF-8的编码类型。
通过以上方法测试获取出来的值还是乱码。
· 解决办法
设置 File Encodings的Transparent native-to-ascii conversion为true,具体步骤如下:依次点击
File -> Settings -> Editor -> File Encodings
将Properties Files (*.properties)下的Default encoding for properties files设置为UTF-8,将Transparent native-to-ascii conversion前的勾选上。